They go by many names: climbing net, play net, parrot hammock, rope gym and others. Whatever you wish to call them, they are a fantastic addition to your bird’s play area. The only problem with them is that they will set you back about $75-$150 depending on the size. You can find the one pictured here. They are so easy to make, however, that you don’t need to shell out that kind of cash.
Find a good rope company, and buy in bulk, preferably on the spool. You can contact the manufacturer or wholesaler, and ask for a sample before you buy. You’re going to use a lot of rope, so shop around to get the best prices. Wholesalers will offer a far better deal than the online bird stores.
One important consideration when looking for cotton rope is that the rope you receive is always thicker than what is stated. For instance, I had ordered a sample of 3/8 inch cotton braided rope for a project I was working on where I needed it to fit through drilled 1/2 inch holes. My rope sample was WAY too thick, looking more like 5/8 inch or 3/4 inch. They explained to me that rope thickness is intended to reflect the size it becomes when tension or weight is added, making it never thinner than 3/8 inch. If you choose to use cotton rope, buy it in much thinner diameters. Birds don’t have enough weight to bring the rope the intended width.
My personal preference is for the natural fiber ropes in a project like this one. Not only do they make a more natural looking product, but when a parrot does chew through a part of the grid, it is an easier material to tie back together but more importantly, there is less fray because there are fewer strands used to create the rope. Whenever fray appears on your climbing net, or any toy or cage accessory for that matter, it must be trimmed immediately to eliminate the possibility of entanglement. In the end, the decision of what type of rope to use must come from the bird owner. You know your bird’s chewing habits best, and this is your call.
Whatever kind of rope you select, be sure it is of safe quality for birds. Hemps, jutes, sisal and other rope products imported from India might be sprayed with pesticides in the cargo hold of the ships that transport them. Contact the wholesaler to make sure that it will not be contaminated when you buy it.
NEVER buy rope from hardware stores or marine suppliers. They carry rope that is typically intended for outdoor or underwater use and it will be treated to make it more durable. Always smell the rope for chemicals to be sure.

The first step is to decide on a size for your net. For photo purposes, I am going to make a small net. If you want a net that is twice the size, double the lengths. You will need a LOT more rope than this net appears to use – it is only about 30”X 24” and I used nearly 90’ of ¼” sisal rope. Keep in mind that nets using a thicker diameter of rope will need extra length because the knots will take up more rope length. It’s a good idea to cut each piece longer than you expect to need it to be because if it winds up to be too short, that piece, and your time, will be wasted. You can always trim down long pieces at the end, so go for extra.
I started by cutting a 16’ length of rope, which I folded in half and then tied a basic knot in the end leaving a 2”to 3” loop. This length of rope is going to boarder all sides of the net and will be considerably longer than the other pieces. The loops at each corner of the will allow you to hang the net when you are finished.

I made this net with 3 ½” X 3 ½” squares, which is appropriate for medium to large birds. This is intended as a climbing net. If I were making a hammock, I would use rope with a thicker diameter for easier perching for larger feet. And I could scale the grid back to about 1-2” squares for a small bird although a small bird is certainly capable of getting around on this net. If you choose to make the net grid smaller, expect to use twice as much rope.

Cut 14 lengths of rope that are 5’ long (remember this length is for a 24’ X 30” net). Begin to attach them to one side of the long rope with the looped center starting at the loop and working down spacing them evenly (this net uses 3.5” spacing).

The knot itself is the most important part of this structure. It looks very complicated, but I promise once you do a few of them, you won’t even need to use the guide photo anymore. I practiced with a pair of shoelaces until I got the hang of it.


When you begin the second row and the others that follow, you will need to draw the long end of the rope through the knots in order to get the “tail” to end up on the outside of the net. It is a little bit harder, but by the time you get to the second row, you are an expert at these knots and will have no problem figuring this out.


Try to keep the grid pattern somewhat even, but don’t stress about it. Your bird will not notice that not all sides of the square are perfectly equal. You will find yourself adjusting the gridding as you go along anyways. Tightening the knots to create even(ish) squares is the hardest part of making the net. But as you gain experience with the knots and the rope type, easier ways to get the job done will present themselves.

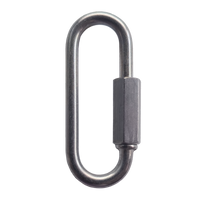
You can attach your net to the ceiling using the same screw eye or screw hook hardware you would use to hang a potted plant. Attach a quick link to the rope loop, and a chain to the quick link. If you’re use a screw eye in the ceiling, another quick link will attach the chain to that.
Here are some tips and suggestions for your net:
- Use a smaller diameter of rope for your smaller birds. They will feel more comfortable being acrobatic on a net they can grasp onto.
- Try stringing some plastic and wood beads onto the rope as you go along. Or even some toys and shredders. Many parrots wind up hanging upside down by one foot from the bottom of the net anyways and this will give something to look at while they’re down there!
- If you’re feeling really adventurous, try dying the cotton rope lengths different colors with VitaCritter dyes. You’ll have a multi-colored net when you’re done. Just be sure to let the rope dry thoroughly before you make the net.
- Hang the net at an angle for a true climbing experience for your bird.
- Small nets, with a small grid, will work in a cage corner as a sleeping or preening hammock. Be sure to set it up high, and only off in a corner, so there is no entanglement when your bird is playing with other toys in the cage.
- When attaching your net to the ceiling, use deterrents to keep him from climbing up to the ceiling where damage could be done. There are two good ways of doing this: 1) Place a thick piece of PVC piping over the chain that you install your net to the ceiling with. Make sure that the piping goes all the way from the ceiling down to, and covering, the rope loops, and is too thick in diameter for your species of bird to get a grip on to climb. And 2) Hang an over-sized toy from the ceiling that covers the chain. While your bird can technically climb the toy, he is more likely to play with it and it is a distraction from the things you don’t want him to notice. Make sure the net is hung low enough that the ceiling is out of reach.
- If you are making a large net and working with long lengths of rope it might help to wrap some masking tape around the ends to keep them from fraying while you are working with it.
The first net you make will take more time than will subsequent nets – like the ones your friends will ask you to make for them when they see yours.
Author Patty Jourgensen specializes in avian health, behavior and nutrition and has been working with and caring for rescue birds since 1987.


16 comments
Hard to believe cameras were that good 16 years ago, before I was born!
This demonstrstion made it really easy to make a huge climbing net for my Congo Grey. Thanks for taking the time!
It’s actually called a cargo knot or a climbing net knot or a japanese crown knot
Birdtricks team answered my last comment, luckily I did figure it out on Google. The knot is called a two-strand crown knot, I suggest watching a youtube video, the pictures here do make sense when you know how the knot is done. Thank you birdtricks team for answering!
The instructions for the knot is awful. Could have at least put the name of the knot so we could look up clearer instruction
This is a Xmas gift to my large burds…im using 3/8th susel…id like to make 4′×4′ times two. So how much rope? And help!!!! Those knots…im so confused….thank you merry Christmas!
Please redo the knot directions…im struggling…..stupid I guess…
What are some good rope wholesalers? Any recommendations are helpful. Thank you.
Wow! I’m so excited to get started! I’m hoping I’m able to pick up the knots quickly- I have so many ideas!
Looks great. Thank you for the instructions. 😁
Very interesting and a practical way of explaning. How suitable is nylon, not for birds but pergola’s for example.
Thank you. I just finished one that measures 88” x 115” It’s going to line the ceiling and provide a place to play in the birds room.
Hi Crystal at the bottom of the article there is suggestions on what ropes are ok. I’m heading of to make this, and I’m adding wooden blocks and beads, also a couple of foraging toys to make it more fun. Wish I could add pic when done. Cheers Lorraine
I have birds from cockatiels to Quakers and Goffin Cockatoo. I would like to buy only spool. What size would you recommend? Thanks
Hard to believe this was posted 10 years ago! I have made several nets using your instructions and have always used natural fiber line/rope. These are the guys I use…US company, doesn’t use chemicals and oils and sells to folks who make pet toys including birds. I buy it by the spool…and thought that if you haven’t found them as yet, might be of value. Cheers and Thanks for all the info/experiences…. T.W. Evans Cordage Co. tel 800-356-0275 fax 401-944-6850 www.twevans.com
Hello! Do you have any suggestions for rope that you trust?
Leave a comment